Are you ready to take your yoga classes online? Itching to connect with your students and offer a chance to practice in community even while we are physically unable to be together?
Good news! It’s easy to stream your yoga classes with Zoom.
Zoom has become a very popular choice with yoga teachers for live online yoga classes over the last month or so. It’s a great platform because teachers can invite registered students via email with a simple link, see all participants on the screen, and control who joins the class.
This guide will show you how to use Zoom to teach online, in just a few simple steps!
Set up your Zoom account
To create your Zoom account, visit zoom.us and click on the “Sign up, it’s free” button at the top right.

While it’s free to create an account, you’ll probably want to pay for the Pro plan for £11.99/month ($14.99USD).
A free plan only allows 40 minutes of live streaming when you have more than 3 people in the meeting, but a Pro plan covers uninterrupted streaming for up to 100 participants.
Schedule your class
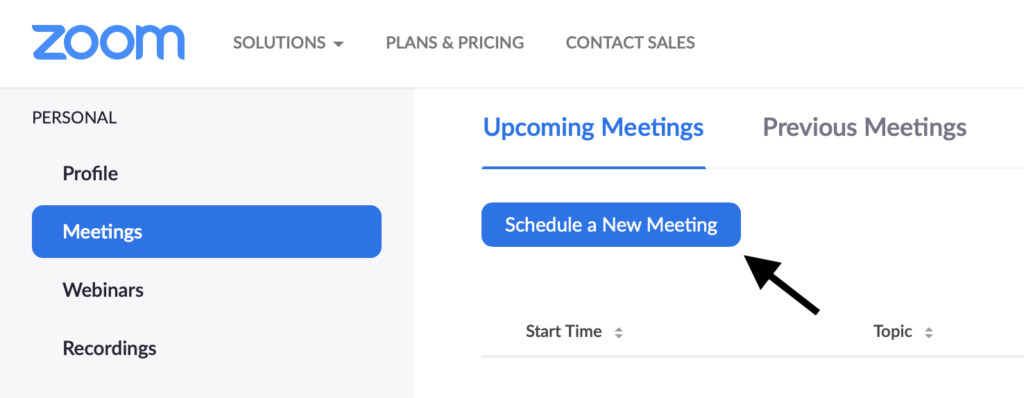
Once inside your account, you can schedule a meeting by clicking “Schedule a New Meeting” on the Dashboard, or by clicking Settings on the sidebar menu.
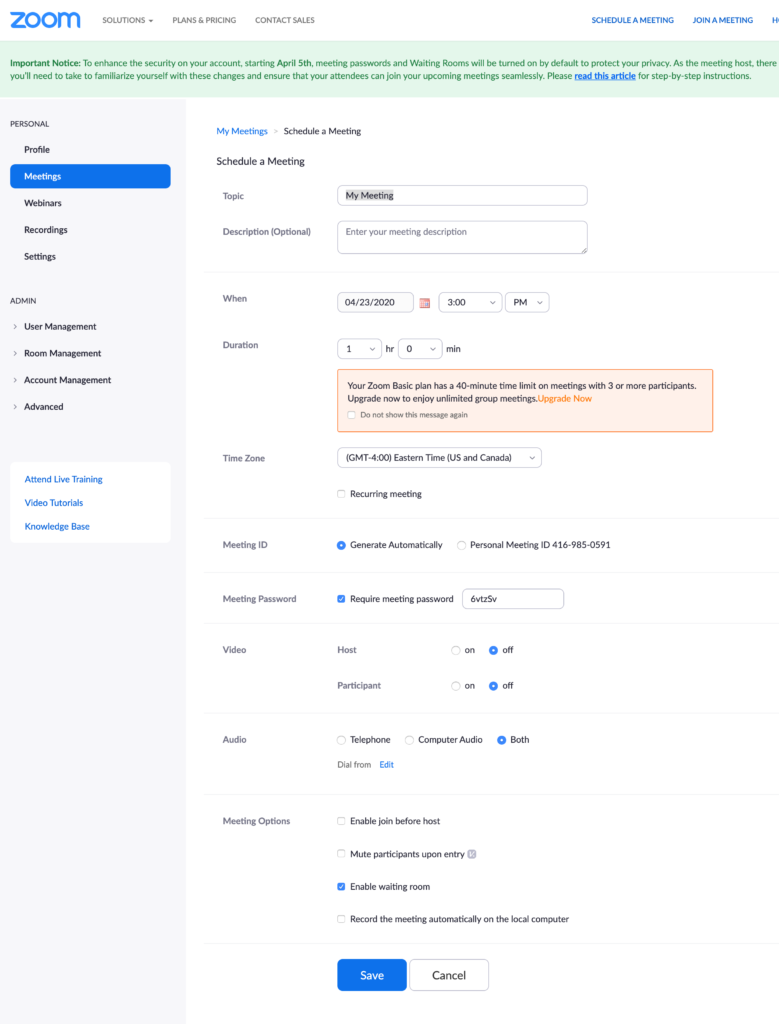
Next you’ll fill out the details for your class.
Topic: This is the name of your class.
Description: This is optional, because your students will see a description of the class on your booking software.
Duration: This is the length of time that your class is scheduled to run, but Zoom will not cut you off if you go over that time.
Time Zone: Choose your time zone.
Recurring Meeting: This option will generate a single URL for multiple meetings, so use this only if you have a class that is running over several weeks and your students have all paid up-front for that block booking. If you generate a recurring meeting for a class that meets at the same time every Wednesday and have a student who pays for only one class, that student will still have access to that meeting link for the remainder of the recurring classes.
Meeting ID: You can keep “Generate Automatically” ticked.
Meeting Password: Uncheck the box next to “Require Meeting Password”. This creates an unnecessary barrier between you and your students when using Zoom to stream classes.
Video: Be sure the Host video is on so your students can see you. If you don’t want to see your students’ videos, you can turn Participant video off, otherwise, keep this ticked on.
Audio: I recommend selecting “Computer Audio”, and encouraging your students to use a laptop or desktop to join the meeting so that they have the best experience. If you want to give students the option to join by phone, you can select “Both” here.
Meeting Options: Zoom will automatically enable the waiting room, which means your participants cannot join the live room until you add them. This is fine when you have a few participants, and want to be sure that everyone who is joining has paid for the class.
As your classes grow, you will probably want to disable the waiting room feature. This eliminates an extra https://digitalyogaacademy.com/wp-content/uploads/2023/05/5-money-making-ideas-for-consistent-income-in-your-yoga-business-for-2023-4-1-2-3.jpgistrative task for you, and you’ll find that most students aren’t going to share their class link with someone who hasn’t paid. Your students value the work you do and what you offer them!
Recording: I recommend setting the meeting up to record ahead of time so that you don’t forget to do it. If you’d rather wait, you’ll have the option to manually hit record once you’re in the live room. You can choose to record on your local computer or save it in the cloud, but be aware that cloud space is limited.
For the best quality, record locally to your computer, and plan to get an external hard drive where you can save your class recordings so you don’t run out of storage space on your computer.
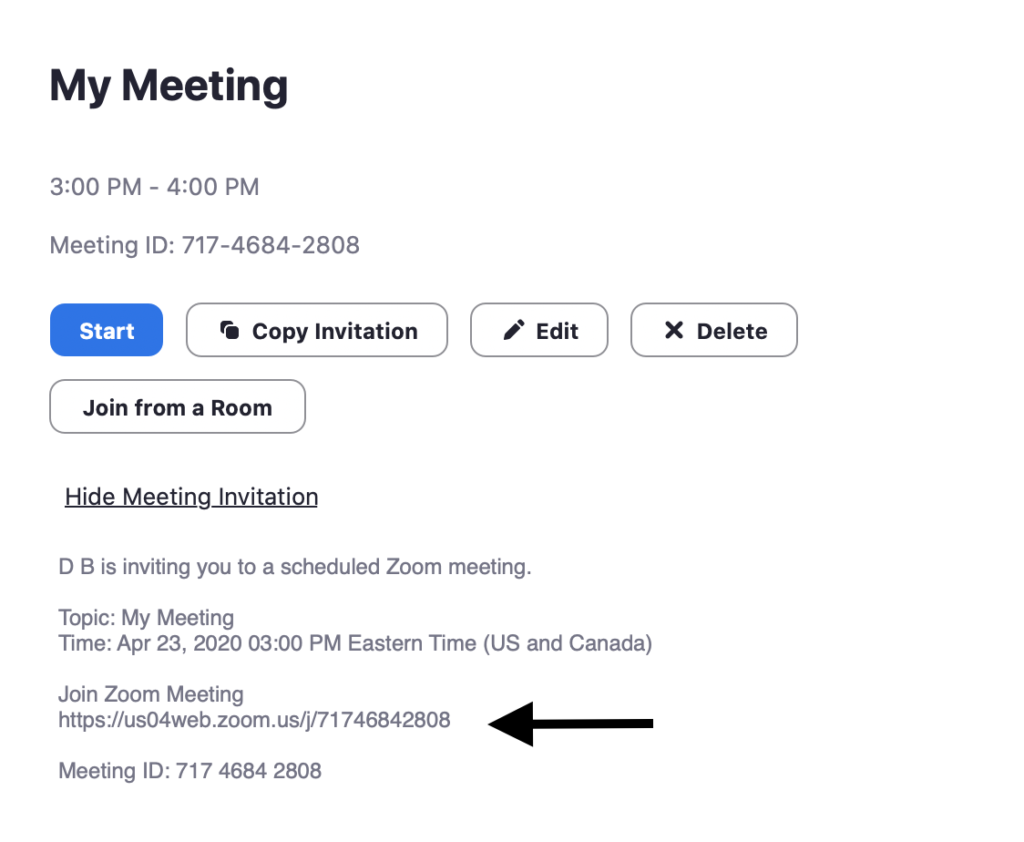
Save your meeting, and you’ll see the shareable URL link. This is what you’ll send to your registered students via email.

At the bottom of your screen, you’ll see there’s an option to livestream to Facebook.
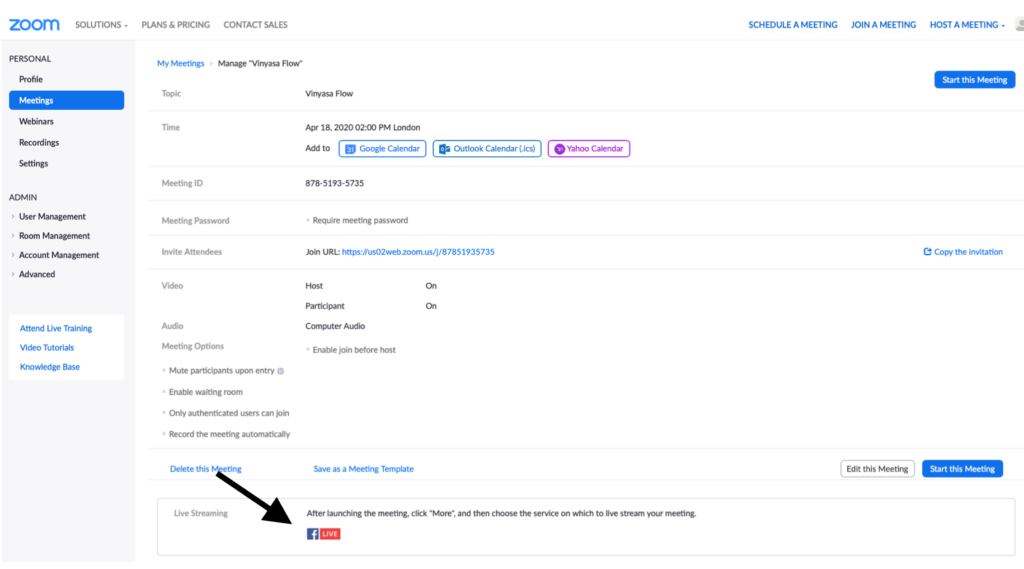
You’ll need to enable this before you can use it. Click settings on the sidebar menu and then In-Meeting (Advanced). You can choose to allow live-streaming on Facebook if you’re planning on offering live classes in a Facebook group.

Share your class link
Click on the meeting name to download the Zoom software on your computer and start the meeting.
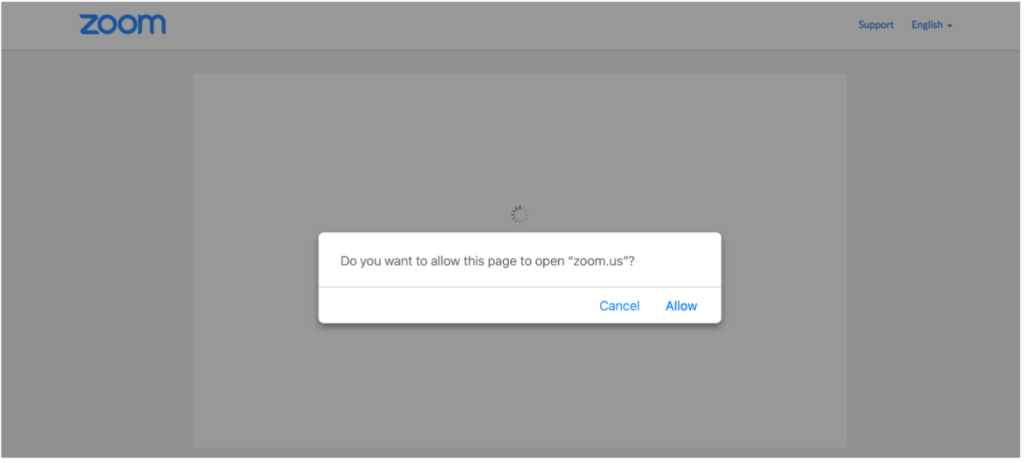
Once you do this, the Zoom icon will open on your dock. Going forward, you can open Zoom directly from your computer rather than going to the webpage.
When you open Zoom from the dock, you’ll notice that you have a Personal Meeting ID (PMI). If you click over to the meeting you’ve just set up, you also have a link to that room.
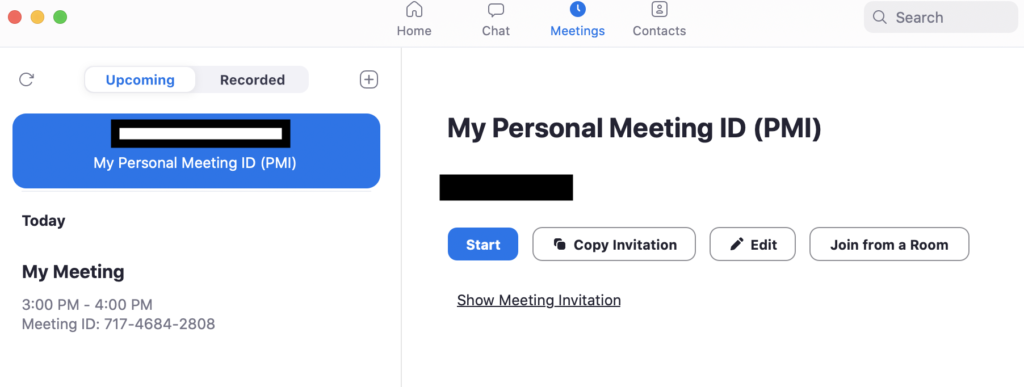
When you share the URL with your students, be sure you’re sending the unique link to the class you’ve created and not your Personal Meeting ID.
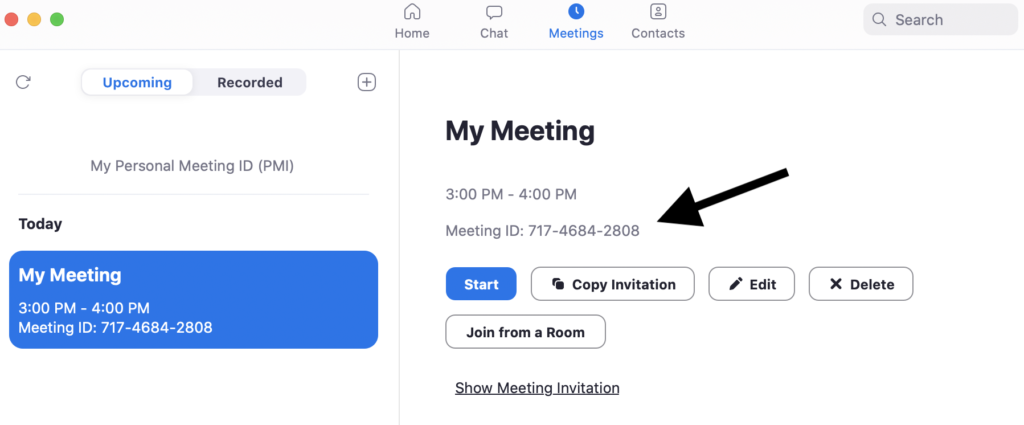
If you give everyone your PMI, then they will always have access to your personal Zoom room and you might get accidentally Zoom-bombed by someone when you’re not expecting it! Keep your account organized by generating and sharing unique links for each event.
Once students register for class through your booking software, simply email the unique class link so they can join. Zoom is great because students don’t need to create an account to join the class. All they do is click the link you send and they’re in!
You can also copy the link and send it on any platform you like, such as WhatsApp or Facebook.
Manually sending links is fine when you have smaller classes. As your classes grow, you might want to consider an integrated system like Instabook or Acuity that handles bookings, payment, and automatically sends the class link to your students.
Should I use the invitation?
You’ll notice that there’s a link to copy the invitation to the meeting.
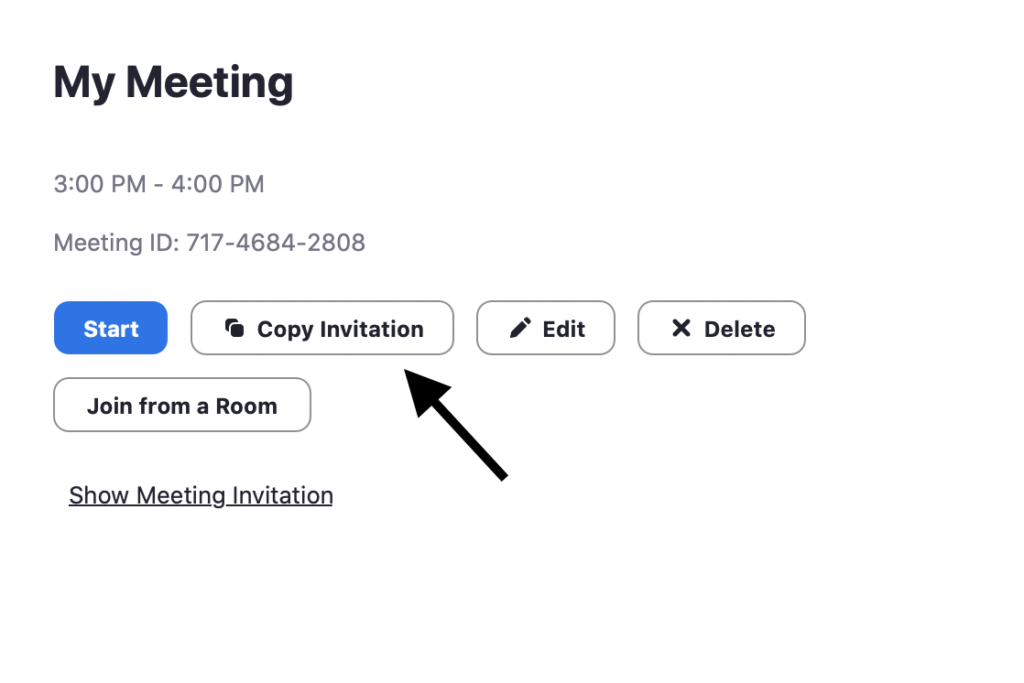
Click “Show Meeting Invitation” to see the invitation. It’s a lot of information. If you think that might be overwhelming for your students, you can just copy the URL and send that to them. It’s all they need.
Test your virtual studio
Test your connection and audio before going live, every time. As reliable as your internet provider may be, you’d be surprised by how many issues pop up at the last minute, throwing your entire schedule off.
To check your connection, you can easily run your browser through a speed test, or just click around a few web pages to make sure it’s working properly.
Run an audio test
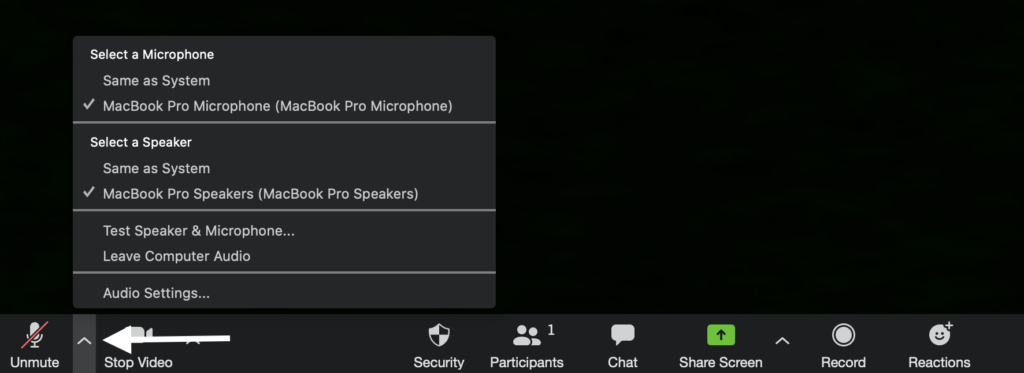
Click on the arrow next to the mute icon to open the Audio options. You can select “Test Speaker & Microphone” or click “Audio Settings” to make sure everything is working.
Zoom will play a ringtone to test your speakers, and prompt you to speak and then play your recording back to test the microphone. Once you have completed the testing, close the window.
Record your class
Recordings are reusable assets that you can use multiple ways in your business. You can improve your online teaching skills by reviewing the recording after class, or to send the recording to students who want to attend but can’t make it the live class time.
To record your online yoga classes on Zoom, navigate to Meetings > Settings and then choose the “Recording” tab.

Check the “Local Recording” option to be sure that the toggle is on. You’ll also have the option to choose “Automatic Recording” which will record meetings as they start.
There are also some options for notifying participants about recording, if you wish to use these.
You’re ready to go!
Congratulations! You’re ready to host online yoga classes using Zoom.
Teaching online can be easy. Don’t let the technology overwhelm you. There are additional tools and tricks (stay tuned for our next post) that can level up your online offerings, but you can start simple and add more as you feel ready.
Looking for More?
If you want to expand your online offerings in a big way, and are looking for expertise, community, and personal attention, check out our flagship program, The Profitable Yoga Teacher.
You can also join over 10,000 yogi entrepreneurs sharing ideas, encouragement, and inspiration in our lively and welcoming Facebook group.
FREE VIDEO TRAINING
Easy steps to take your yoga classes online during COVID-19 & beyond: ACCESS THE TRAINING


